Back to the regular broadcast. Going off the painted scraps from the original, I knew the frames were spaced 30 inches on center. I went ahead and drew these fake frames into my fake boat. The technical word for fake frames would be stations.

From there I could level CATCH 22 on sawhorses and measure my offsets at each station.

I also needed some sort of reference line from which I could locate these offsets vertically in the world. Wouldn't you know a string makes a darn good line. Essentially I went along a string stretched over the bow and stern, measuring the depth and width to each corner. A little bit of time in CAD, viola!

These may or may not be correct offsets for this particular type of boat but hey, it'll be close enough.
So while I debated what flavor of wood I wanted to make these out of, several random but important task had to be checked off my list. My beloved band saw had finally burnt up its thrust bearings. I'm sure this had nothing to do with the fact they were original, probably older than me, or that I've been resawing 6" thick maple regularly with it. The saw was apart anyways because someone was cutting green logs into coasters.... without any guide. We all know not to cut round stock on a bandsaw without properly securing it. If you don't the piece will spin, hog up the blade, and throw firewood at your face while bending your brand new TimberWolf blade. Trust me.
Unluckily for me Delta no longer makes any parts for the model 28-190. I figure a bearing is a bearing and ordered up two new ones from Motion Industries right down the road from me. I punched out the old shafts and stuck them in the freezer. This is a pretty slick trick my old man taught me with press fit components. Cooling down the steel of the shafts will actually shrink the material ever so much, and make sliding them into whatever race you need to a breeze. If you came here from google trying to find part numbers for a 12" Delta Bandsaw. Here you go: 608Z 8mm Bore, 22mm diameter, 7mm width. Get two of them.

None of that is very exciting but you know what is? Building a strongback. It's also something I had to do before actually starting construction of the real boat. A strongback is essentially a very rigid frame on which I'll build this boat. Check out that snazy contraption below. I settled on construction grade 2x8's. Spacing cross members 30" on center gave me a really convenient place to attach the boat frames, and adding wheels will make it easy to move this thing around. For now the strongback is a really nice chopsaw stand. Is that a black Friday special craftsman sliding compound miter saw? Yes you too could build a boat low quality tools and it will still float.

While I was contemplating whether or not I'm really going to build my own sailboat, Highland Hardwoods had a fire sale on 4/4 white oak surfaced 3 sides. It was a few pennies more per board foot than I can find locally rough sawn in some Mainer's back yard (I consider hardwoods a good value at $2/bd ft, this was $2.65/bd ft with my good looks). The advantage was it was kiln dried, already machined up, and ready to work. Guess who's making a boat out of white oak?

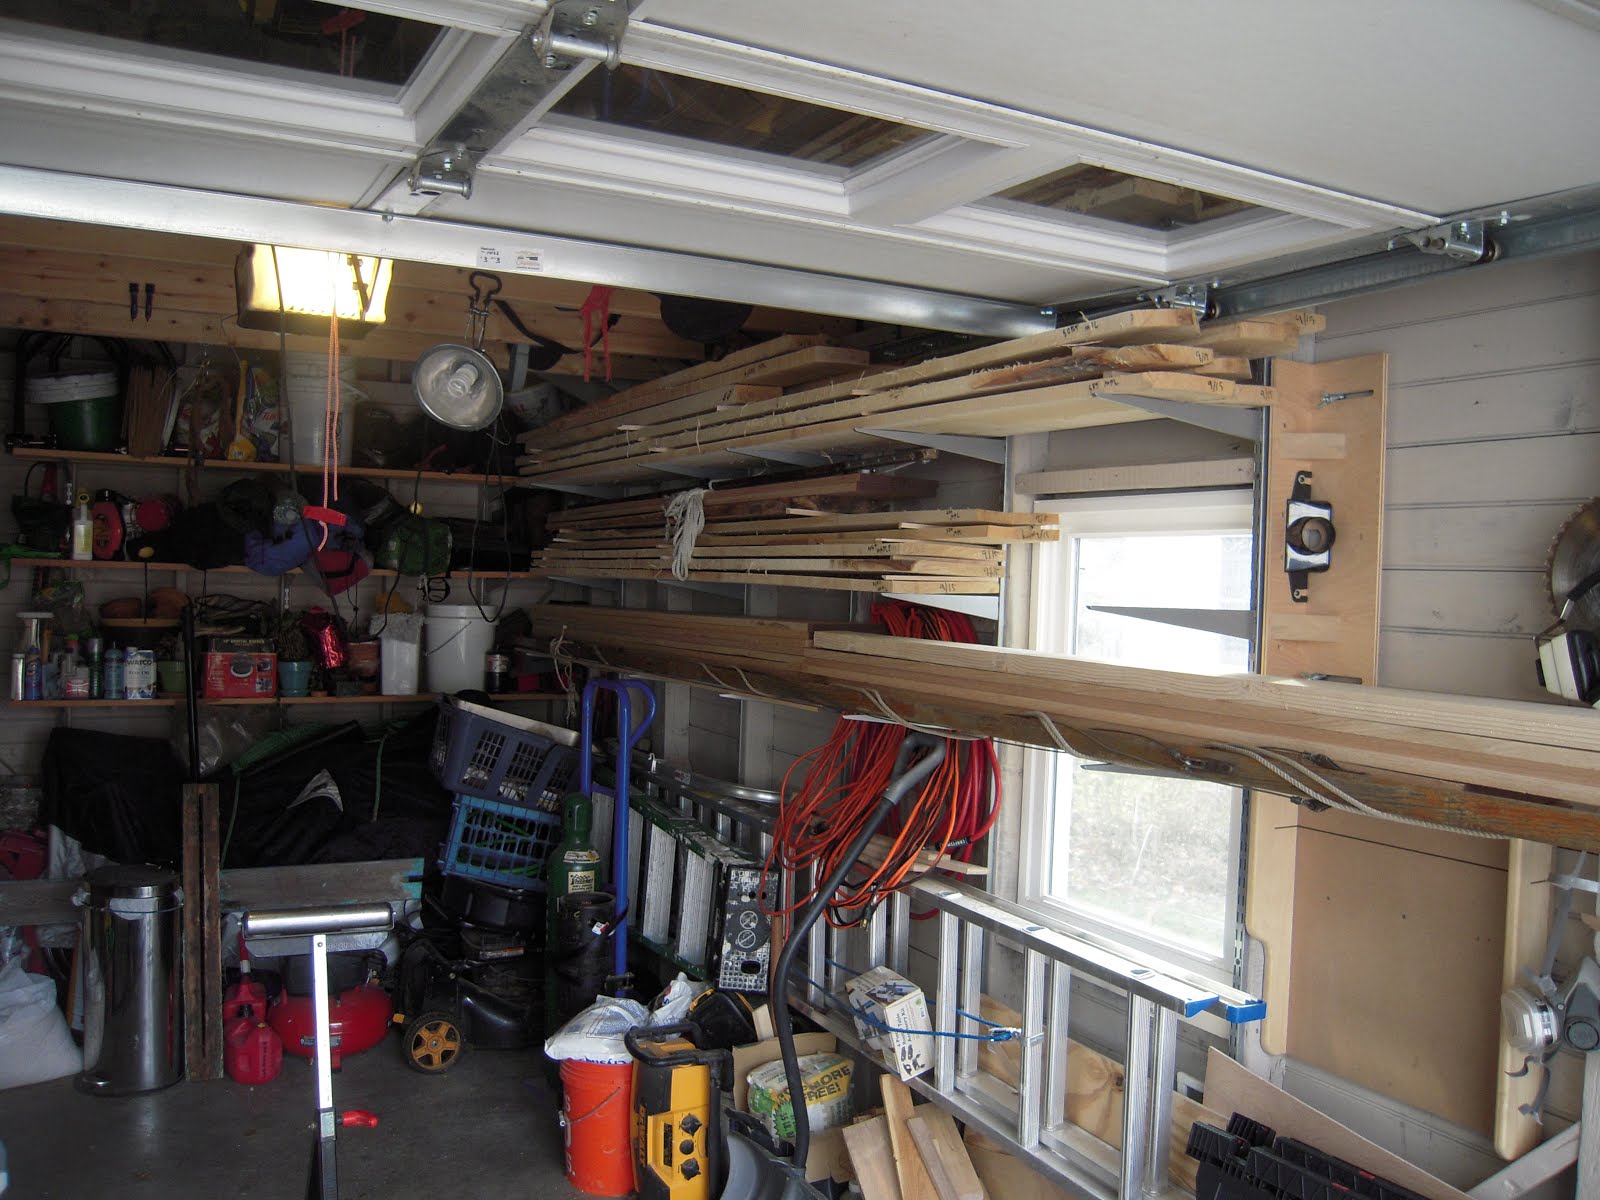
And I get to answer this question: What does 200 board feet of various hardwood look like in a crowded one boat garage?
So white oak is a great wood that is naturally rot resistant, and has been used for a long time in boat building. It's also great for outdoor furniture. My lovely fiancé is getting a pair of white oak Adirondack chairs next spring for putting up with this boat building nonsense of mine.
There was only one instance where my little chop saw couldn't cut me the angle I wanted. I'm limited to 50 degrees angles and one cut tipped the scales at 53. So By holding the piece perpendicular to the fence the cut became the 37 degree compliment.

A bunch of cutting later it was time to glue the frames up. The advantage of white oak's natural oily rot resistance also prevents adhesive from working well. All my research pointed toward using West System's G-flex epoxy on white oak. I had a 4oz kit of this stuff laying around from patching royalex canoes and am giving it a shot. I thicken the mix with fine saw dust.

I lofted up the frame plans on my workbench and quickly ran out of room. Plopping some reference lines and wax paper down on the basement floor expanded the operation. Kitty litter and all.

This also gave me time to glue up some laminations for the bow stem. As an aside, Bessey clamps are on sale at your favorite orange big box store for under $3/clamp right now.

So that's where things sit. I've ordered three sheets of 6mm marine grade oakoume plywood from Atlantic Hardwoods in downtown Portland. That'll be in mid week and I'll cut some gussets to reinforce the frames.
Total Man Hours: 18
Total Cash Dollars: $112 <--- including $50 for the strongback
Really good stuff. Am building a regatta sea-farring yacht with my 9 year old son, just started it, but am stuck on-the part that says to "taper the frames towards the bow and the remainder towards the stern"
ReplyDelete