Tuesday, December 22, 2015

Adirondack Xmas Gifts

Outdoor furniture undergoing cat trials

Well I woke up Saturday morning and decided with less than a week until Christmas I better get going on a couple of my gifts. Celia has wanted a pair of Adirondack chairs for about two years and it was high time I actually built them.

 I started with a set of plans my father-in-law loaned me this summer. Authentic New Yankee Workshop prints to go with all the white oak I picked up in one of the other blog post. Luckily Celia doesn't venture out into the garage when "boat" things are happening so these got built in absolute secrecy.

I began roughing out boards on the table saw, and felt new whiskers prickling out of my face as I channeled my inner Norm Abrams

The plans are simple, and there is actually a magazine article available online from the August 2005 issue of Popular Woodworking. If Steve Shansey and Norm knock out two chairs in a full day, surely I could finish two in a weekend? In the end I think I clocked a bit over 16 hours to build a set.

Also Norm doesn't tell you how many stainless steel screws you need for the build. He cops out and gives you some line like "Every man should have enough fasteners on hand for this project." Cue my masculinity dropping a peg. The answer is 50 screws per chair by the way Norm.

This was also the first project I've done in a long time where I didn't start from rough sawn lumber. It was a bit of a treat. Especially after I found this little gem:


Looks like a bit of nail/barbed wire/ bullet grew into the tree and someone hit it with their planer. I'm glad it wasn't me.

So once everything was cut to width and length I had a pile of white oak that resembled something like this at the end of day one:

Even though I ran out of the garage and met her in the driveway whenever she came looking for me I still hadn't raised any suspicion from my better half. Nothing to see here but boat stuff...

The next day started with a lot of band saw work. All the patterns were traced out in the wee hours of the morning. Once 9:00am hit I figured it was time to fire up the dust collector and let the band saw eat. There was one difficult piece that needed a 30 degree taper. I was debating how I would accomplish this for a while. I finally read that magazine article and good old Norm just tilts his bandsaw bed to match the incline of the back slats.


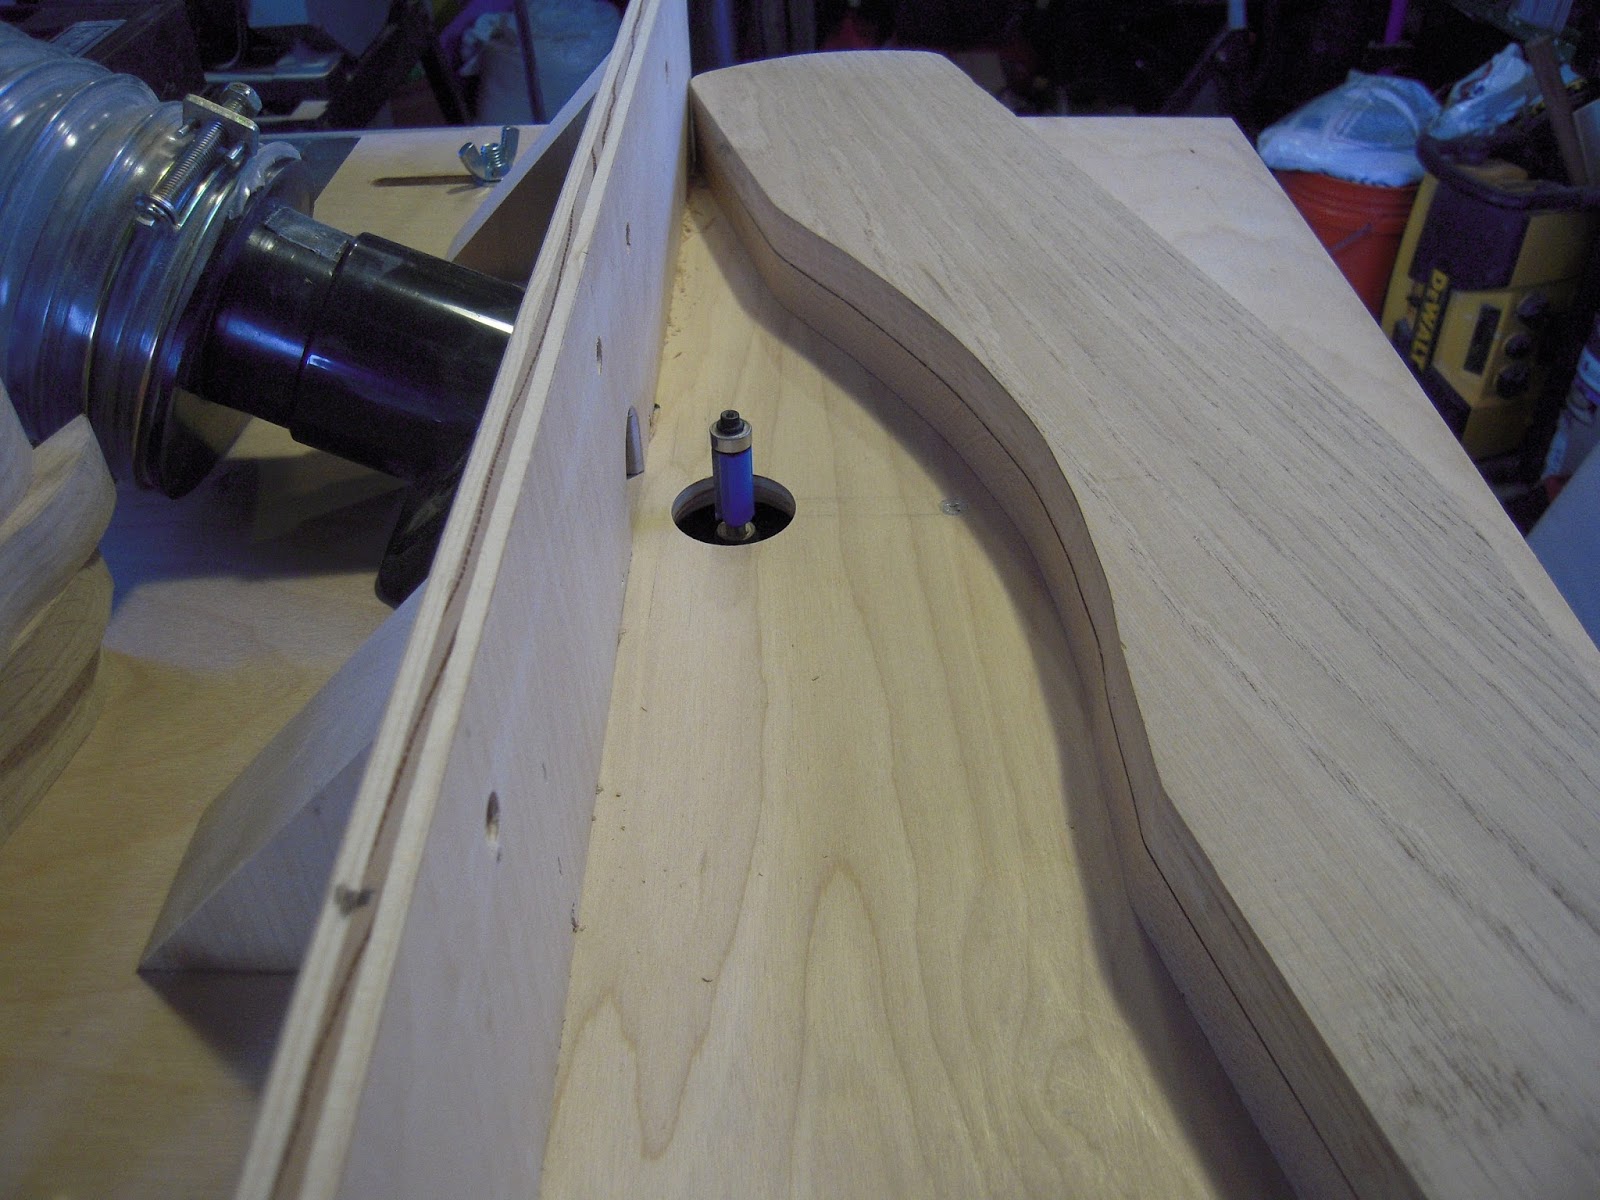
Since all the parts were mirror images and the two chairs were identical I only had to cut out one of everything accurately then used that as a pattern. The rest of the parts were trimmed hastily to within an 1/8" of their final shape. Here's a photo at the router table. I'd attach the one nice pattern to a blank, and using a pattern bit I could trim out copies of everything for two chairs by lunch. Then it was time to take a break to go rock climbing.

 A glorious milestone. All the pieces are at their final dimension and all that's left is to chamfer edges and machining is done.

 Just for the record about half way through the project I hated white oak. It's a bear to work with and splinters like crazy. Here's a cute little chip embedded in my router fence. A half dozen of his cousins were in my palms by now too.

 Maybe some monotonous sanding added to my disdain for this devil material.

So by the end of the weekend all that was left was assembly. I figured chances were high Celia would see all these parts and figure out what was up. So I hid them in a hope chest down in the basement. This photo also captures some boat frames, a half dozen hand tool restoration projects, and who knows what else. Well actually my fiancĂ© would point out that the hope chest itself is also a project.


 This little lady came by to visit at some point.


Monday after work assembly began. I had a few hours when Celia was out of the house at Yoga and thought this would be a slam dunk. The rear cross member and bases go together first.


While that rested I put the legs together. 

 Then the front went on the base.


The legs get attached to the base with some stainless steel carriage bolts.

Around here is where I begin to panic. "Doesn't Norm Abram know yoga ends at 6:00. How am I suppose to keep a secret around here." Oh yes the old towel trick, it actually worked. Twice during assembly Celia ventured to the basement to get some odds and ends none the wiser. Must have assumed I was doing something boaty.


One neat technique I picked up to avoid splintering wood when drilling - run the bit in reverse for a quick second to score a circle then drill as usual. Makes for a nice clean hole.

No turning back now this is a chair whether I like it or not. Using some clamps and 3/4" spacer blocks really helped keep everything where I wanted it while I squared things up.
 
Checking for square on the bench. It was "alright." Just needed to fudge the back end a little before I put the top screws into the back rest. These were attached from the center out and spaced by eye.

 All that is left is attaching the seat slats and get this upstairs.
 
Here's a close up the rear seat slat. It actually conforms to the curve in the back rest which is a really neat little detail. As a frugal bonus it is the waste cutoff from the lower back brace. Oh that Norm!

So at some point I had measured the stairway and wrote down "3 0". All along I was thinking I meant a 3'-0" wide door and my 30 1/2" wide chair would fit no problem. Turns out what I wrote down in fact meant 30"....

 
You read these stories all the time about guys building boats and furniture in their basement that they can't get out. Well now I understand. Luckily I only had minimal disassembly ahead of me. By now it was about an hour past bed time and I feared Celia thought I had lost all sanity. Remember she had no idea a furniture catastrophe is unfolding downstairs.

 
So in the end I built one chair, halfway disassembled it, and built it again. I finally had a second to sit in the chair and admire it. Not so bad close up. That white oak is hard to work with but boy does it look good. Now that the dust has cleared all the difficulty milling it up was worth it.


 Now I have to put together its mate. Should be much easier without all this cloak and dagger carpentry. That's a post Christmas project.


Monday, December 14, 2015

Frames

Buckle up this is a long post. When I last left you we had just finished making a fake boat from which I could take measurements to build the real boat. Why not just build the real boat first then? When you're using a ply on frame construction technique Frames come first. However I didn't know what the frames should look like since they were rotten away long ago. Hence my catch 22 and the fake boat.  In fact that's what I'll name the fake boat sailing in my backyard, CATCH 22. Romantic....

Back to the regular broadcast. Going off the painted scraps from the original, I knew the frames were spaced 30 inches on center. I went ahead and drew these fake frames into my fake boat. The technical word for fake frames would be stations.


From there I could level CATCH 22 on sawhorses and measure my offsets at each station.
 

I also needed some sort of reference line from which I could locate these offsets vertically in the world. Wouldn't you know a string makes a darn good line. Essentially I went along a string stretched over the bow and stern, measuring the depth and width to each corner. A little bit of time in CAD, viola!

These may or may not be correct offsets for this particular type of boat but hey, it'll be close enough.

So while I debated what flavor of wood I wanted to make these out of, several random but important task had to be checked off my list. My beloved band saw had finally burnt up its thrust bearings. I'm sure this had nothing to do with the fact they were original, probably older than me, or that I've been resawing 6" thick maple regularly with it. The saw was apart anyways because someone was cutting green logs into coasters.... without any guide. We all know not to cut round stock on a bandsaw without properly securing it. If you don't the piece will spin, hog up the blade, and throw firewood at your face while bending your brand new TimberWolf blade. Trust me.

Unluckily for me Delta no longer makes any parts for the model 28-190. I figure a bearing is a bearing and ordered up two new ones from Motion Industries right down the road from me. I punched out the old shafts and stuck them in the freezer. This is a pretty slick trick my old man taught me with press fit components. Cooling down the steel of the shafts will actually shrink the material ever so much, and make sliding them into whatever race you need to a breeze. If you came here from google trying to find part numbers for a 12" Delta Bandsaw. Here you go: 608Z 8mm Bore, 22mm diameter, 7mm width. Get two of them.

None of that is very exciting but you know what is? Building a strongback. It's also something I had to do before actually starting construction of the real boat. A strongback is essentially a very rigid frame on which I'll build this boat. Check out that snazy contraption below. I settled on construction grade 2x8's. Spacing cross members 30" on center gave me a really convenient place to attach the boat frames, and adding wheels will make it easy to move this thing around. For now the strongback is a really nice chopsaw stand. Is that a black Friday special craftsman sliding compound miter saw? Yes you too could build a boat low quality tools and it will still float.


While I was contemplating whether or not I'm really going to build my own sailboat, Highland Hardwoods had a fire sale on 4/4 white oak surfaced 3 sides. It was a few pennies more per board foot than I can find locally rough sawn in some Mainer's back yard (I consider hardwoods a good value at $2/bd ft, this was $2.65/bd ft with my good looks). The advantage was it was kiln dried, already machined up, and ready to work. Guess who's making a boat out of white oak?

And I get to answer this question: What does 200 board feet of various hardwood look like in a crowded one boat garage?


So white oak is a great wood that is naturally rot resistant, and has been used for a long time in boat building. It's also great for outdoor furniture. My lovely fiancé is getting a pair of white oak Adirondack chairs next spring for putting up with this boat building nonsense of mine.

There was only one instance where my little chop saw couldn't cut me the angle I wanted. I'm limited to 50 degrees angles and one cut tipped the scales at 53. So By holding the piece perpendicular to the fence the cut became the 37 degree compliment.


A bunch of cutting later it was time to glue the frames up. The advantage of white oak's natural oily rot resistance also prevents adhesive from working well. All my research pointed toward using West System's G-flex epoxy on white oak. I had a 4oz kit of this stuff laying around from patching royalex canoes and am giving it a shot. I thicken the mix with fine saw dust.


I lofted up the frame plans on my workbench and quickly ran out of room. Plopping some reference lines and wax paper down on the basement floor expanded the operation. Kitty litter and all.


This also gave me time to glue up some laminations for the bow stem. As an aside, Bessey clamps are on sale at your favorite orange big box store for under $3/clamp right now. 

So that's where things sit. I've ordered three sheets of 6mm marine grade oakoume plywood from Atlantic Hardwoods in downtown Portland. That'll be in mid week and I'll cut some gussets to reinforce the frames.


Total Man Hours: 18
Total Cash Dollars: $112    <--- including $50 for the strongback

Sunday, December 6, 2015

The Mock-up

Ah yes, a beautiful Saturday in Maine. December without snow and temperatures above freezing? Sounds like sailing weather to me.

After some pretty extensive research online I had some descriptions of the boat dimensions and a few photos to go by. Alarmingly no plans or stations are available that I know of. So looks like this drawing from an old issue of Wooden Boat magazine will be my spiritual boat building guide.


I figured I could use what was left of the original boat as a template and create a full size mock-up from $13 sheets of luan and measure that to create my own stationing to loft the new frame. This would also give me a taste of stitch and glue boat building if I ever decide to go that route for another project.

So I spent the morning scraping frost off plywood, pulling nails, backing out scews, and trying to trace non-existant plywood edges.


Which I then cut out:

My lines weren't the smoothest so this little fella was a huge help. It's a Stanley 9 1/2 on loan from my father that is probably as old or older than myself. I'd like to think if tools had emotions this one is happy to chew wood again.


Next began the stitching. Using some galvanized tie wire, I predrilled holes along the keel and tied the two hull bottoms together while they were folded and booked match. Opening them up it pulled itself in a curved shape.
Holy cow this actually looks like a boat

Then came the sides. I figured it would be easiest to start at the bow, and use the rest of the plywood to lever the hardest curves into shape.


Okay I would call this a boat
 In surprisingly quick fashion the hull came together. I attached the deck and cut a thwart to stretch it out to the proper beam size. And decided to have some fun.

 
 I started clamping on any and all of the original pieces from the pile and got a real sense of what this will look like. I can't wait to wake up and see this puppy bobbing on it's mooring at the lake each morning.

Stay tuned for me detailing how I used this model to measure for the frames.
  
As an aside, I plan to track man-hours and cash-dollars this project takes with each post. Depressingly I'm sure this will be double my estimate of $400, and close to the $800 an abused but usable sunfish/laser cost on Craigslist. But this is my boat and I wouldn't have it any other way.

Time Invested: 10 Hours
Cash Invested:  $39.00

The Search and Delivery

I imagine most people have a list of things they wish to accomplish in during their life time. These all fall on a spectrum from simple to arduous. For me one of these goals was to build a boat. Nothing elaborate, just a vessel crafted by hand in my own shop. After having recently bought a lake house the search for a sailboat began. I didn't want this to be a big expense and actually have zero sailing experience. I scoured Craigslist for a sunfish, hopefully in somewhat usable condition that wouldn't break the bank, in need of some work.

I had nearly given up when my father mentioned looking for a Turnabout instead. These were plywood trainers popular in the 50's 60's and 70's. Naturally I jumped on the internet that night and discovered http://n10association.com/. Turns out there is a long story about the design being converted to fiberglass construction and renamed the N10 class.

Planets aligned and a gentlemen, across the bay from me was trying to give one away! The listing was several months old but the boat was in pieces. He grew up sailing these 10 foot craft and wanted to restore one for the youth in his life today. A fellow in Vermont gave him this project, which was intact but severely rotted. As he began removing the wood cancer the boat slowly devolved into a pile of plywood and bronze hardware. Sizing up the new project he decided it was beyond his skill level.

After posting the boat for free he had many many people interested in parting it out but he couldn't bring himself to separate an original woody Turnabout. He was extremely delighted to hear my plans were to bring this old girl back to a seaworthy condition. I would call myself an engineer, and amateur woodworker, but a shipwright I am not. Luckily my father rigged many of these for the Annisquam Yacht Club back in the day, and my god father has quite a bit of wooden boat building experience. They may not know it yet but I'm sure I'll be leaning on them for advice in the coming months.

Five days later my "boat" was delivered! He refused any payment and only requested I contact him when I'm ready to launch. Again I could not thank this man enough and hope to deliver on my promise. It was a rather intimidating to stare at a pile of wood, from a boat, built almost a half century ago, of which I had no plans, and wished to use on top of the water not under....

Here the components that would be the most difficult to recreate and luckily they were all in decent shape.


The hull however was a different story. I actually didn't even know what these boats looked like assembled.
Hey honey we're boat owners!
The following night I started putting together the full size jig saw puzzle.


So I know boats usually have a pointy end and sides. Some rearranging and viola! Maybe I am a ship wright.

It seemed simple enough. Use these as templates on new marine plywood, stitch and glue those together and I'll be sailing next spring.

Then I found this:
 

HAROLD TURNER
BOAT BUILDERS
NEWBURY - MASS

This was in fact an original Turner Woody. The sail number is 752 and she was called "Blowin in the Wind". I'll have to see what other history I can dig up on it. Knowing Turner would roll in his grave if I stitched and glued one of his plywood on frame boats I decided I would try to recreate this as original as possible.